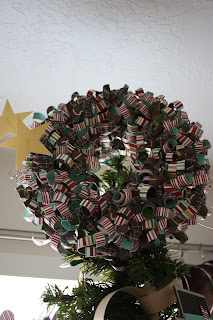
So the other day I was surfing the web checking out some blogs and realized that...
1. People are really talented.
2. Some people have a lot of time on there hands.
And 3. I can craft just as good (or better) then other people!
So I decided to post my FIRST tutorial. I give you....
The Paper Wreathe
The one below is the first one I ever made that was on top of my Christmas tree. I have made a couple sense then but decided to document the making of my last one.
Foam Wreathe: I purchased mine at the dollar store
5 sheets of 12 x 12 Scrapbook paper: It is muccho important to like both sides of the paper, because both sides are visible when the wreathe is completed.
1 pencil
Box of your basic fabric pins
And your choice of ribbon to hang wreathe
5 sheets of 12 x 12 Scrapbook paper: It is muccho important to like both sides of the paper, because both sides are visible when the wreathe is completed.
1 pencil
Box of your basic fabric pins
And your choice of ribbon to hang wreathe
 This project seems like it would take a lot of time...it really doesn't. I rolled all of the paper while I watched the movie Hairspray. And to actually complete the wreathe only took me 1 Greys Anatomy episode and 1 episode of Project Runway....Yes this is how I measure my time. It's just something simple you can work on while you catch up with your DVR.
The first thing you need to do is cut your paper. I cut the paper in the middle to give me
2--6 x 12 pieces. Then I cut the paper in strips that are 3/4 inches wide. After you have all of your paper cut...its time to roll. That's when I pour a pepsi (you can drink anything you want) grab a bowl and start to roll. I use the bowl to put all of my curls in so they don't go everywhere. You want to roll your paper super tight: like below

Then after I have all my paper rolled I start to assemble. Your paper will stay in the curl so you have to stretch it out so you have the shape that you want.
 Then I start pinning the paper in. I only use one pin in either end of the paper. I usually start on the outside edge and work in. It doesn't matter which way you start. Its easier to do one direction and then go another way but by the time you are done you will just be shoving in paper anywhere that needs it. When you start to get toward the middle I will place the pin in the middle of the curl so it will lay flatter. This way is also good to fill in space.
 When you have all of your paper pinned in...and make sure you go back and cover up any holes you left on the wreathe. The good thing is that this wreathe is very east to manipulate and shape the way you want it. I usually put my ribbon on first before I start pinning but it doesn't matter. I usually never do the back of this wreath because I want it to hang flat. If you have a door or window that you are hanging it on and will see the reverse then go ahead and do the back..you will probably need 3 extra sheets of paper. MAKE SURE...you can not see any of the wreath from the side...huge pet peeve!
And ta-da...Its so stinkin cute when it is all finished!!


